Welcome


Friday, December 19, 2014

Believe Christmas Layout

Merry Christmas Everyone, Happy Holidays and Happy New Year!

File is from the Silhouette Store Believe by PPbNDesigns.com. The paper used is from Echo Park I had left over from the Merry Christmas line. I added some pearls on the Believe for something extra and inked my edges with Powder Puff chalking ink from Quick Quotes. Pretty simple and a very fast layout. Hope everyones holidays are happy and safe!

Thursday, December 18, 2014

Hey Diddle Layout


 Love how this layout came out. I used both the Cricut Explore and the Silhouette Cameo on this, yes they do play well together. Both machines have their place and I have found both machines have good features and things that can be improved upon.  The Once upon a time title was cut with the Explore, the cutting was fantastic the only problem I found was I can't change the colors of the layers so I used my copics to change some of the colors in it. The cow is from Too Cute By Jessica because Nikki doesn't have a cow for the set yet and I was impatient. I made the photo frames by combining two rectangle shapes. The rest of the Hey Diddle Diddle pieces are from PPbNDesigns links to follow Hey Diddle Moon (cut on Cameo)Hey diddle dish and spoon (Explore)Hey diddle fiddle (Explore) and a Peachy Keen stamped face, Hey diddle cat (Explore) and all the other shapes were cut with the Cameo with shapes from the Silhouette store. I wrote the poem in the white space because I just couldn't leave it white. The little disks are perler beads melted and stuck on with Glossy accents.


Place Perler bead on baking sheet with either a silicon mat or parchment paper standing up. Oven preheated to 400 degrees. Bake for 12 minutes turn off oven and allow beads to cool in oven.
This is the pack I used
I found that the different types and colors melt differently. The pearlized ones in this pack took two times in the oven to close up and still looked funny. The stripped ones are so cute with the two colors. Try this just for fun if you have some Perler beads around. They do stink while cooking so beware.

Wednesday, December 17, 2014

Happy New Year

OK new picture I got almost identical cuts with both the Explore and the Cameo ( I just had to zoom in when I was tracing so I could see that second border)  The Explore was easier but both gave excellent results.
 The top print then cut is from the Explorer. Love how easy it was to put design into program push a button and it decided the cut lines. It picked up even on the slightly grey outline. Con was I could only cut it at around 8 inches. I wasn't given a choice of print quality not sure if this was because of computer or program. I used my apple computer because that is what is attached to my Explore. Bottom print then cut was done with my Cameo. Again the cut was beautiful, could of made my print larger but choose to make same size as other. Cons program did not pick up on the lighter grey border so it cut it off. The print quality is different because I could choose type of paper and quality I wanted in the Silhouette program. I could of messed around with my tracing but didn't.
The bottom cut was also done on the Cameo using the preset print options so closer to the Explore and adding a offset to my image. I will have to say the Explore was the easiest to cut. I could of gotten the Cameo to do better but I was trying to use the same effort on each as if I was a beginner. I do like the fact I can cut larger images with the Cameo because it allows me to use my large format printer better.

Friday, December 12, 2014

Santa Owl card

This is a card I made to send out. I printed the png. file and then sized the two green svg. file pieces to fit on my base to give it some depth. I added ultra fine Flower soft to the brim and ball of hat. Before I cut the base I offset the image because I wanted the white layer. To make it a card I cut this layer twice and placed a fold line on the back image. Simple card but came out cute. File I used was Santa Owl.

Sunday, December 7, 2014

O Christmas Tree

The files I use are car with Christmas tree, O Christmas TreeNorth Pole Sign, and Colorful Christmas Tree. The paper I used was from BoBunny the Candy Cane Lane collection. This is two sided so I had plenty of choices. I choose to cut my paper in half and put back together from 1/2 of another sheet. I then choose a paper for the borders, The photo corners are from the Silhouette store. The 2014 is the Candy Cane font from the Silhouette store. Hope you are have a Blessed Christmas season. I bought the paper in OKC, OK  at a cute shop called Paper Crown her web site is www.papercrown.net.

Monday, December 1, 2014

Birthday Bash

Birthday Bash file at ppbndesigns.com or 
Design ID #48471
9/12/2013 at the Silhouette Store

I know most people are doing Christmas layouts but my daughter was born Dec. 24th so I need a birthday layout for her. I used her favorite colors and had some fun with this layout. Picture doesn't show the glitter. Hope everyone enjoys this layout, I had fun making it.

Friday, November 21, 2014

Thanksgiving table

 Thanksgiving Turkey is the file I used for all my decorations. The napkin rings and the placecards are print n' cut. The centerpiece turkey is pieced. The wreath around the turkey is from the Silhouette Store 
Design ID #69551
11/10/2014 
 The place card is a rectangle cut 4 x 31/2 inches. The turkeys are all about 2 1/4 inches. I put all 8 turkeys on one mat sized added the white offset, printed and then cut.

Monday, November 17, 2014

Happy Turkey Day files from PPbN

I am the guest designer for Die Cuttin' Divas this week and the challenge is Thanksgiving.
 Design ID #51289  in the Silhouette Store, or look under designer PPbN and you can find it plus a lot of other cute designs. The paper I used is Flourish Fusion by the Paper Studio. I cut two papers in half and cut the third paper into thirds using it to glue the other two paper together for a 12 x 12 paper again. The doily cut under the turkey is a Silhouette store file that I stretched oblong to fit my turkey. The tag in the upper right hand corner is hand cut a hole punched and ribbon added.

I hope everyone has a fantastic Thanksgiving and a Blessed day with family. Thank you for coming to my blog.

Monday, November 10, 2014

and they lived Happily Ever After.

Sleeping Beauty Exclusive file.
The paper is Fairytale Castle Right #36440 from www.scrapbookcustoms.com. When I saw this paper I knew I had to have it and I love this layout. That could be because my son, my daughter in law and my three grandkids are on the layout but I do love how it all came together. The frames are from the Silhouette store and the file is a PPbN Exclusive file for members only. A great reason to join.http://www.ppbndesigns.com/memberships/. Hope you love the page as much as I enjoyed making  it for one of the kids scrapbooks.

Monday, November 3, 2014

Thanksgiving Layout

Well, Halloween is over so I have started on Christmas and Thanksgiving layouts. I do not scrap in order always because I am trying to catch up on a few books and still keep up on the current books. This paper is pretty old from my stash, but since I have vowed to either use my stash or get rid of it I decided I could use these two papers. I had to cover the bow on page one because I wanted to turn the paper around to change things up on the layout. The Cute Turkey worked well since it was fat. Other files used on page one were Gobble Gobble Title, leaves were just taken from the title and made larger, and the Pilgrim owl (indian owl).

 On page two I used Pilgrim BoyPilgrim GirlThanksgiving pie,  Pumpkin, the date was just a font on my computer.
I changed a paper that I wasn't using into a cute layout. Really shows how my scrapbooking has changed over the 40 some years I have been doing this, I never buy papers with frames on it already anymore, I create my own designs and layouts now.

Sunday, October 26, 2014

Monday, October 20, 2014

Finger Puppets with bendy card.

 I loved the card by Samantha Walker from the Silhouette Store but wanted it to be a fun card for my granddaughter so I knew just what to add, print then cut figures from PPbN Designs.com. Instead of piecing such small figures I used the .png.


Design ID #53879                         
1/13/2014

Sleeping Princess and the retired set Once Upon A Dream. I used a cone shape to turn these cuts into finger puppets.

I print then cut the Happy Birthday title to go on the inside and cut the Princess. I hope my grand daughter will love this card.


Print Then Cut with the DE software for the Silhouette Cameo. I have updated to 3.0.343

1. Choose design, I choose the png but you can also color and put back together the svg file. For this I am going to talk about a png file.
2. add the Registration marks. 4th button at top from the right. Looks like sheet of paper with registration marks. Under style button choose your machine.
3. Now to get cut lines go to 6 button from right. Open trace window. The one with a butterfly.
Select trace area and make a box around image. Now time to play with the different settings. I turned off High Pass and moved the Threshold to 100%. The balloons on my image didn't completely yellow out but I am just tracing the outside edge so it worked for me. Trace outer edge.
4. If you are wanting a white border just use the offset and remember to take away the other cut line.
5. Choose print setting for you printer and print. Button looks like printer.
6. Put paper on mat and I add a extra light in front of my machine. Cut.
 Add the Registration marks and make sure your image is inside the marks.
This is with High pass on and I might have gotten away with this since I only need the outline but I choose to unclick that and use the Threshold to 100%.

 Just showing the cut line, move image back into place to print and then cut or if you like the white border use the offset but remember to remove the first cut line either by moving it out of the way or changing it to no cut.


Friday, October 17, 2014

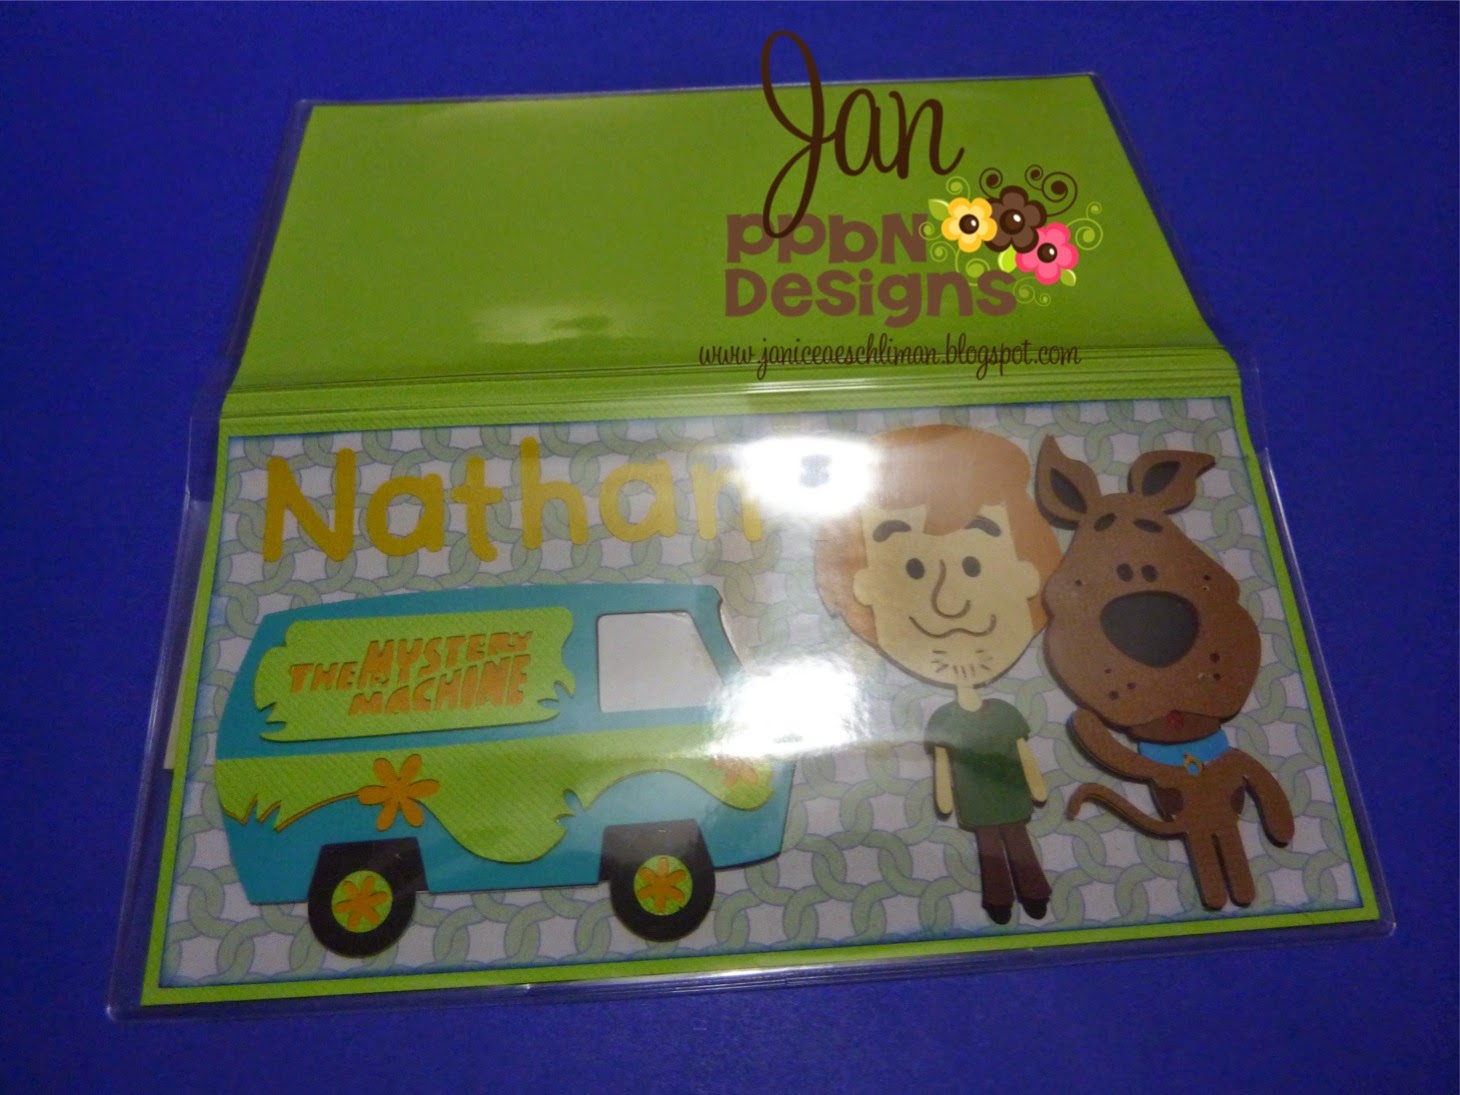
Check book cover with PPbN Design files.

Check book cover using the Scooby Doo patterns from ppbndesigns.com. I cut the files for Scooby and Shaggy at 2 1/2 inches. They cut amazingly even at that small size. I just sized the Mystery Machine to fit in the space I had let.


 This is after I placed into a clear Vinyl Checkbook cover  by A. i. P.www.Vippies.com just look for clear checkbook covers, I also found them on the Peachy Keen Stamps site.


My dimensions for the back ground were 6 1/8 x 6 5/8. I scored the middle of the 6 5/8 side and 1/4 on each side of that. The accent paper was cut at 3 x 6.


For my checkbook I wanted to use money so this is how I did that.

 This is a press my hubby made but two paint sticks and a couple clamps work just as well.
 Stack of new dollars plus a piece of cardboard the same size. I also place a sheet of paper on either side as protection.
 Put all this in vise setup with the straight edge just sticking out. Using Padding Compound paint the edge well and allow to dry. Padding Compound can be found several places Amazon has it. You just need a small amount so buy the smallest container you can. You can use this to make notebooks/ paper pad, books and anything you want stuck together along an edge. The dollars or paper in a pad will just tear off along the edge painted. Sort of like a rubber cement.

Monday, October 13, 2014

Halloween Page

Ok, I love pink, purple and lime green so that is what I used on this page. Decided Halloween didn't need to be orange and black. The file I used is from PPbN Designs Halloween scrapbook page kit. This makes it so easy to complete a page in a short time. Hope you have a wonderful week and enjoyed this weeks project. Today is my 35th wedding anniversary, I am lucky to be married to my best friend. Love you hubby! Going to spend the day with him.

Tuesday, October 7, 2014

Halloween Card

Hello everyone I am posting on Tuesday this week because I am a guest designer Die Cuttin' Divas this week. My challenge this week was to use this sketch to make a card or layout.
I decided to make a Halloween card.

The file I used was Scary-Haunted House and for the title I used Halloween title both from ppbndesigns.com. For fun I cut the bottom layer from glow in the dark paper. Hope you enjoy this card as much as I enjoyed making it.

Monday, September 29, 2014

Halloween Owl Wreath

Good morning everyone, hope you all are enjoying a beautiful Fall. I made these owls last week and decided I needed to use them on my Halloween wreath. Any wreath can be decorated with your paper piecings and can be changed out so easy for the next year. Files used were Frankenstein-owl,Mummy-owlVampire-owlBat-owl, and Witch-owl all from PPbNdesigns.com. Hope you enjoyed this project as much as I did.

Tuesday, September 23, 2014

Owls from PPbN Designs

Whoo thinks these are cute? I will be making something with them for my next PPbN Designs blog post. Check back on Monday!